Raspberry Pi3 Model B+ 導入メモ
初めてRaspberry Piを買ってセットアップしたので手順メモ。
この手のブログは世の中にありふれているけれど自分用の備忘として。
やったこと
Raspberry Piを購入し、MacbookからSSHで接続するところまで。
用意したもの
基本的にはプライムデーにまとめて購入。ほとんど値段は変わっていなかったが一部は安くなっていたかも。
| 種別 | メモ |
|---|---|
| Raspberry Pi3 Model B+ | ケースとヒートシンク付 |
| microSDカード | Transcendの32GB |
| MicroUSBケーブル | 2.4A対応のもの |
| LANケーブル | 特にこだわりなし。安かったやつ |
| USBキーボード | ネットワーク設定ミスしたとき用に念の為に用意。結果的に使わなかった。 |
| SDカードリーダ | MacbookがTypeCしか使えないため、MicroSDカードにOS書き込む用 |
| 電源タップ | 自宅の電源がカツカツだったので大きめのものを購入。ラズパイにはUSBポート一つあればOK。アンペア数は要確認 |
| MacbookPro(2017) | Mojave 10.14.5 もともと使っているもの |
MicroSDカードにOS書き込み
OSダウンロード
Raspbian Buster Liteをダウンロードします。 GUIは使わないのでLiteの方です。
ちょうど1週間前くらいにリリースされていたみたいです。
公式サイトからだと時間がかかるのでミラーサイトからダウンロードしました。
# ダウンロード
$ wget http://ftp.jaist.ac.jp/pub/raspberrypi/raspbian_lite/images/raspbian_lite-2019-07-12/2019-07-10-raspbian-buster-lite.zip

# ハッシュも確認
[koh@kohs-MBP] ~/Downloads
% shasum -a 256 2019-07-10-raspbian-buster-lite.zip
9e5cf24ce483bb96e7736ea75ca422e3560e7b455eee63dd28f66fa1825db70e  2019-07-10-raspbian-buster-lite.zip
[koh@kohs-MBP] ~/Downloads

# 解凍
$ unzip 2019-07-10-raspbian-buster-lite.zip
書き込み
公式サイトのCommand lineの箇所を見ながら作業します。
SDカードリーダ越しでMicroSDカードをmacbookに接続してからコマンド作業
Disk確認
[koh@kohs-MBP] ~
% diskutil list
/dev/disk0 (internal):
   #:                       TYPE NAME                    SIZE       IDENTIFIER
   0:      GUID_partition_scheme                         251.0 GB   disk0
   1:                        EFI EFI                     314.6 MB   disk0s1
   2:                 Apple_APFS Container disk1         250.7 GB   disk0s2

/dev/disk1 (synthesized):
   #:                       TYPE NAME                    SIZE       IDENTIFIER
   0:      APFS Container Scheme -                      +250.7 GB   disk1
                                 Physical Store disk0s2
   1:                APFS Volume Macintosh HD            96.1 GB    disk1s1
   2:                APFS Volume Preboot                 44.0 MB    disk1s2
   3:                APFS Volume Recovery                509.8 MB   disk1s3
   4:                APFS Volume VM                      1.1 GB     disk1s4

/dev/disk2 (external, physical):
   #:                       TYPE NAME                    SIZE       IDENTIFIER
   0:     FDisk_partition_scheme                        *30.9 GB    disk2
   1:             Windows_FAT_32 NO NAME                 30.8 GB    disk2s1

[koh@kohs-MBP] ~
%
上記の場合だと/dev/disk2。(external, physical)の箇所やSIZEを見て確認する。
アンマウント
% diskutil unmountDisk /dev/disk2 #上で確認したパスに適宜書き換え
データ書き込み
[koh@kohs-MBP] ~
% sudo dd bs=1m if=~/Downloads/2019-07-10-raspbian-buster-lite.img of=/dev/rdisk2 conv=sync
2096+0 records in
2096+0 records out
2197815296 bytes transferred in 82.910093 secs (26508417 bytes/sec)
[koh@kohs-MBP] ~
%
パスは適宜書き換え
ofは/dev/rdiskXになるので注意
起動時のSSH有効化
[koh@kohs-MBP] ~
% touch /Volumes/boot/ssh
[koh@kohs-MBP] ~
% ll /Volumes/boot/ssh
-rwxrwxrwx  1 koh  staff  0 Jul 15 15:11 /Volumes/boot/ssh*
[koh@kohs-MBP] ~
%
/Volumes/boot配下に空ファイル作成することで起動時のSSHが有効になる。
取り出し
[koh@kohs-MBP] ~
% sudo diskutil eject /dev/rdisk2
Disk /dev/rdisk2 ejected
[koh@kohs-MBP] ~
%
上記コマンド後にMacbookからMicroSDカードを抜いて完了
組み立て
開封して下記手順に沿って作業
ヒートシンク取り付け
赤矢印の箇所にヒートシンクを取り付ける。両面テープになってるのでペタッと貼る。

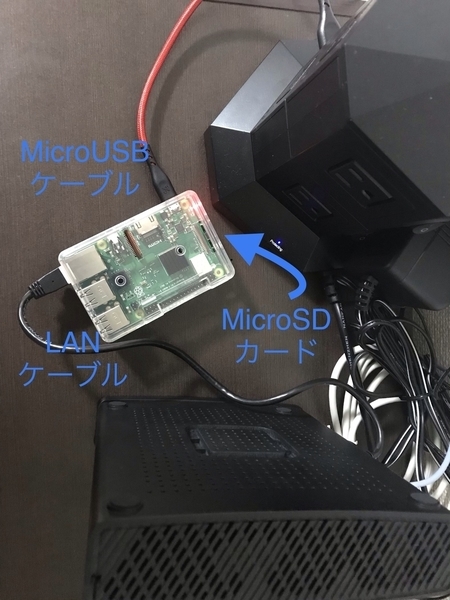
各種接続
MicroSDカードを矢印のところへ差し込む。
LANケーブルを差し込む。反対側はルータへ。
MicroUSBケーブルを差し込む。
電源のランプが付くことを確認

MacbookからSSH接続
Raspberry PiとMacbookが同じネットワークにいればraspberrypi.localで名前解決できるのでSSHする。
初期パスワードはraspberryです。
[koh@kohs-MBP] ~
% ssh pi@raspberrypi.local
pi@raspberrypi.local's password:
Linux raspberrypi 4.19.57-v7+ #1244 SMP Thu Jul 4 18:45:25 BST 2019 armv7l

The programs included with the Debian GNU/Linux system are free software;
the exact distribution terms for each program are described in the
individual files in /usr/share/doc/*/copyright.

Debian GNU/Linux comes with ABSOLUTELY NO WARRANTY, to the extent
permitted by applicable law.
Last login: Mon Jul 15 10:24:17 2019 from 240b:12:13c1:6c00:d577:c046:4cf5:fd03

SSH is enabled and the default password for the 'pi' user has not been changed.
This is a security risk - please login as the 'pi' user and type 'passwd' to set a new password.

pi@raspberrypi:~ $
ちなみにこの名前解決はmDNSという仕組みで解決しています。
ラズパイ上でavahiというサービスが動いています。これを知らなくて結構調べました。。。
最低限設定
piユーザのパスワード変更
$ passwd pi
タイムゾーン変更
$ sudo timedatectl set-timezone Asia/Tokyo
SSH設定変更
公開鍵の配置をした後、Rootログインとパスワードログインを禁止
pi@raspberrypi:~ $ diff sshd_config /etc/ssh/sshd_config
32c32
< #PermitRootLogin prohibit-password
---
> PermitRootLogin no
56c56
< #PasswordAuthentication yes
---
> PasswordAuthentication no
pi@raspberrypi:~ $

$ systemctl restart sshd
apt-get update
$ sudo apt-get update \
  && sudo apt-get -y dist-upgrade \
  && sudo apt-get -y autoremove \
  && sudo apt-get autoclean
今後の作業予定
OS側の設定作業の自動化
とりあえずAnsibleが使えそうなのでサクッとPlaybookを書いて構成管理できるようにする。
監視を入れる
mackerelの無料アカウントがあるのでそれで監視しようかと検討中。
Linuxの基本的な監視とハードウェア周り(CPUの温度)とかも監視したい。
vcgencmdを利用する。
Wifiでの接続を試す
ルータがイケてないのか有線のラズパイと無線のMacbookでipv4での接続ができない。ipv6だとつながる。
Wifiでつないで無線同士だとつながるのか確認する。
ipv6も勉強する。
まとめ
とりあえずSSHでログインして最低限の設定をするところまででした。
業務ではクラウドが多いですがたまに物理作業をすると楽しいですね。
参考
Raspberry Pi公式サイト
Raspberry Pi 3のセットアップをMacからSSHを使って行う方法【RASPBIAN STRETCH】
ラズパイでKubernetesクラスタを構築する
3日間クッキング【Kubernetes のラズペリーパイ包み “サイバーエージェント風”】